I managed to put together a wireless accelerometer the other night using my two new XBees, an Arduino XBee shield, an XBee Explorer USB, an ADXL330, and some Python. I struggled a bit with some of it, so here's what I learned:
First, a parts list.
The first thing to do is to configure and upgrade the firmware on your XBees. To do that, you'll need X-CTU (for the firmware upgrade at least, but it's also nice for configuration) which, unfortunately, is only available for Windows. But, it works fine from VMware. First up, the XBee we'll hook up to the computer to read incoming data from the accelerometer:

Now, you should be able to test that everything is working. Connect to the Arduino XBee with the X-CTU terminal. Assuming your accelerometer XBee is powered on, you should see lots of data flying by. The data is transmitted in API packets over the XBee's UART, to the FTDI chip, to your computer's USB-serial device. The API packet specification is in the XBee 2.5 manual. Here's some Python that does part of the decoding.
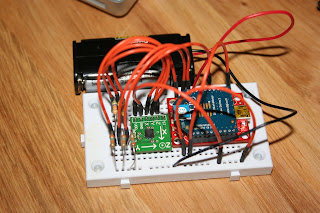
Finally, here is a picture of my breadboarded version (with voltage dividers) of this. It works great. I'm currently working on a PCB so that the whole thing is compact enough to be wearable.
Some further notes:
First, a parts list.
- XBee 2mW Series 2.5 Chip Antenna
- Arduino XBee (with XBee Series 2.5 module)
- XBee Explorer USB
- ADXL330
The first thing to do is to configure and upgrade the firmware on your XBees. To do that, you'll need X-CTU (for the firmware upgrade at least, but it's also nice for configuration) which, unfortunately, is only available for Windows. But, it works fine from VMware. First up, the XBee we'll hook up to the computer to read incoming data from the accelerometer:
- Plug one of the XBees into the Explorer (it's also possible to do this from the Arduino shield by shifting the two XBee/USB jumpers to USB and removing the MCU) and plug it into your USB port.
- Crank up X-CTU, select the appropriate USB communications port (com port), click "Modem Configuration" and then "Read." This will determine what XBee is connected and what firmware is on the device.
- Select "Always update firmware."
- Click "Download new versions..."
- Select the latest version of ZNet 2.5 Router/End Device API. The API version is necessary in order to read the incoming data on the computer. Only API firmware will write incoming sensor data to the device's UART so it can be read over USB/serial.
- Click "Write." You may get an error after the writing is complete. That's normal. It's because you've changed the way the XBee communicates over it's UART. Go back to the "PC Settings" tab, select "Enable API" and then click "Read" on the "Modem Configuration" tab again.
- Under "Networking," change NI (Node Identifer) to something like "ARDUINO". I named mine Arduino because I used the Arduino and XBee shield to provide a USB connection to the computer.
- Click "Write" and hook it up to your computer. This is the XBee that your accelerometer will be sending data to. We'll hack up some Python to read that data later.
- Follow the same steps as before until you reach the firmware selection.
- Select the latest version of ZNet 2.5 Router/End Device AT.
- Under "Networking," change NI (Node Identifer) to something like "ACCELEROMETER".
- Under "I/O Settings," change D0-D2 to 2-ADC. These pins will be used to read from the accelerometer.
- Again under "I/O Settings," change IR (sample rate) to 1F4 (hex for 500 milliseconds).
- Click "Write."
- Go to the "Termainal" tab. To enter command mode on the XBee, send it "+++" (do not press enter). It will respond with "OK". Next type "ATDNARDUINO
" (or whatever you called your other XBee). That will set the destination node to your other XBee. It should respond with "OK". Next, send it "ATWR ". That will write the settings to memory so that they aren't lost when the XBee is powered off. +++OK
ATDNARDUINO
OK
ATWR
OK - Finally, hook up your XBee and ADXL330. You can power both with 3.3V (3V works too). Unfortunately, the XBee 2.5 series ADCs only accept voltages in the range of 0-1.2V. To get better results, you'll need to add voltage dividers on the X, Y, and Z axes. I don't have those in the schematic. If you use 3V, it works well enough to detect motion. For finer mesurements, you'll need the dividers.

Now, you should be able to test that everything is working. Connect to the Arduino XBee with the X-CTU terminal. Assuming your accelerometer XBee is powered on, you should see lots of data flying by. The data is transmitted in API packets over the XBee's UART, to the FTDI chip, to your computer's USB-serial device. The API packet specification is in the XBee 2.5 manual. Here's some Python that does part of the decoding.
import xbeeJust kidding. Although there is a XBee Python library, it doesn't currently support series 2.5 modules.
import serial # pySerialIf you read the spec for API packets, you'll notice I'm glossing over a lot of details. The analog IO bytes are always at the end of the packet. Since we enabled only 3 ADCs, we can just grab the last three shorts.
import struct
import sys
THRESHOLD = 5
tty = sys.argv[1]
s = serial.Serial(tty, 9600)
movement = None
while True:
if s.read() == chr(0x7e): # Packet start indicator.
length, api_id = struct.unpack('>Hc', s.read(3))
if api_id == chr(0x92): # IO packet type.
# Lots of bytes we don't care about followed by 3 shorts.
z, y, x = struct.unpack('>xxxxxxxxxxxxxxxHHH',
s.read(length - 1))
print z, y, x
if (movement is not None and
abs(z + y + x - movement) > THRESHOLD):
print 'You moved!'
movement = z + y + x
Finally, here is a picture of my breadboarded version (with voltage dividers) of this. It works great. I'm currently working on a PCB so that the whole thing is compact enough to be wearable.

Some further notes:
- The chip antenna versions are pretty directional. There's a lot of interference in my apartment (a long story for another post) and I don't get very good range. I plan to buy some more 60mW XBee Pros with wire antennas in the future. I'd recommend getting the high power ones unless you're really concerned about battery life. I wish I had.
- Digi's tech support is really pretty great. I had some trouble flashing one of my XBee's and they got in contact with me on the same business day.
- Unfortunately, the XBee only has 4 ADCs. If it had one more, you could add a pitch and roll gyro to the mix without an additional MCU. Oh, well.
- The XBee pin spacing doesn't match standard breadboards. But, the XBee Explorer USB doubles as an XBee breakout board for breadboard designs (as seen in the photo above) if you solder on some additional headers.